
Installation Tips:
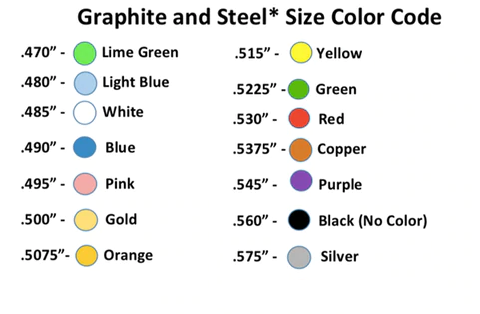
Individual G.S.E.’s are marked with a color mark. When using our Quick Guage® the last color that inserts (disappears) into the shaft butt is the correct starting size.
Note: ~Steel Application - .575”extender = .600” Steel butt size, .560 extender = .580” Steel butt size, .545 extender = .560 Steel butt size.Measure the Interior Diameter (I.D.) of the Shaft to be Lengthened (or use our Quick Guage®). **
Clean and score the interior of shaft at least 3 inches. ***
Choose the indicated size (or one size larger if loose). If the next size up is too large lightly sand the fluted portion of the extender to fit snugly (optimal fit).
The following shows the maximum amount the various sizes can be sanded down to overlap ID shaft wall sizes as shaft inner walls vary...
Note: The assumption here leaves the Flutes at a Depth of .05+ for epoxy adhesion.
| GSE Size* | Butt O.D.* | Tip Max Grind Size*, ** | Tip Color | Steel Compatible? |
| .485” | .600” | .465” | White | No~ |
| .490” | .600” | .470” | Silver | No~ |
| .495” | .600” | .475” | Pink | No~ |
| .500” | .600” | .480” | Gold | No~ |
| .5075” | .600” | .4725” | Orange | No~ |
| .515” | .600” | .480” | Yellow | No~ |
| .5225” | .600” | .4875” | Green | No~ |
| .530” | .600” | .495” | Red | No~ |
| .545” | .600” | .510” | Purple | Yes(.560” Steel)~ |
| .560” | .600” | .525” | Black | Yes(.580” Steel)~ |
| .575 | .600” | .540” | Silver | Yes(.600” Steel)~ |
Prepare the inside of the shaft and the fluted end of the extender by cleaning with alcohol and a "shop style" paper towel or thin lint free cloth (scoring the inside of the shaft with a suitable tool such as a hozel brush and/or sandpaper is also recommended) ***.
DO NOT use water, wax or soap based solutions or grip installation solvents!
Note: Always allow a few moments for the shaft to dry before beginning the glueing process.
Apply a thin layer of epoxy to the inside of the shaft butt. This step insures that there are no voids in the glue when installed and promotes a stronger bond when cured.
Roll Fluted end of the G.S.E. in Epoxy*, filling the flutes.
Rotate the wet G.S.E. as you insert it into the Shaft.
Wipe off excess Epoxy. Clean any Epoxy film from the exterior with a paper towel moistened with rubbing alcohol.
*Allow glue to fully cure.
Important:
* 24 hour (slow cure) high quality Epoxy is strongly recommended.
** Individual Shaft inner walls vary in thicknesses. Light Sanding of the extension may be required for a snug (therefore optimal) fit. Avoid gouging the "Transition Step" shoulder (where the flutes end and the extension shoulder contacting the shaft butt begins) to prevent creating a stress or flex point. Refer to the table above for maximum sanding values.
*** When extending graphite shafts care should be taken to ensure that the fibers are not broken by using too much pressure when cleaning with a hozel brush. When extending steel shafts stronger scoring of the interior of the shaft promotes better adhesion and is prefered.
Simply use a hozel brush and/or sandpaper to gently loosen debris, then use a paper based "shop towel" or thin lint free cloth treated with alcohol and insert it into the shaft several times to remove any residue/debris.
Parage® is a registered trademark of Golfcraft Co., Inc® All rights reserved.